
Installing a 3rd party theme or a Visual Style on Windows can be a complex and scary process for beginners. Especially when it comes to patching and messing around with registry files. This tutorial will break things down to make it easy for first timers to patch their Windows 10 PC for installing custom Visual Styles.
4 Steps to a New Theme:
- Find out your Windows Build
- Create a system restore point
- Patch your system using UXThemePatcher
- Run the .theme of your 3rd party theme
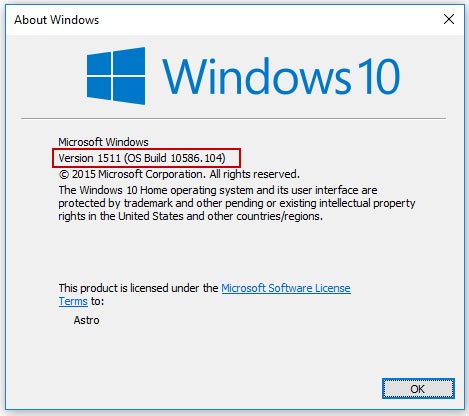
1. Find your Windows build
At the moment, themes made for certain builds of Windows 10 are not compatible with other builds. To find out which version of Windows you have, type winver in the start menu and hit enter.
You can still use 3rd party themes for other builds but make sure you use the right patcher and theme combination. For example, do NOT use a theme made for Windows builds earlier than 10586 while your system is patched for 10586 build and vice versa.
In other words, make sure your patcher AND theme both support your Windows Build.
2. Create a Restore Point
Before you begin patching your computer, make sure you create a system restore point so that we can restore our PC in case something goes wrong. It is really important you do this before going to the next step as a worst case scenario.
3. Patch your System
You only need to patch your system once to enable the use of any visual style on your PC. The most popular option to patch it using UXThemePatcher.
Download UXThemePatcher (10586 Build)
Download UXThemePatcher (Older Builds)
Extract the UXThemePatcher setup, run it and complete the installation. After this, your computer will restart for changes to take effect.
4. Activate the 3rd Party Theme
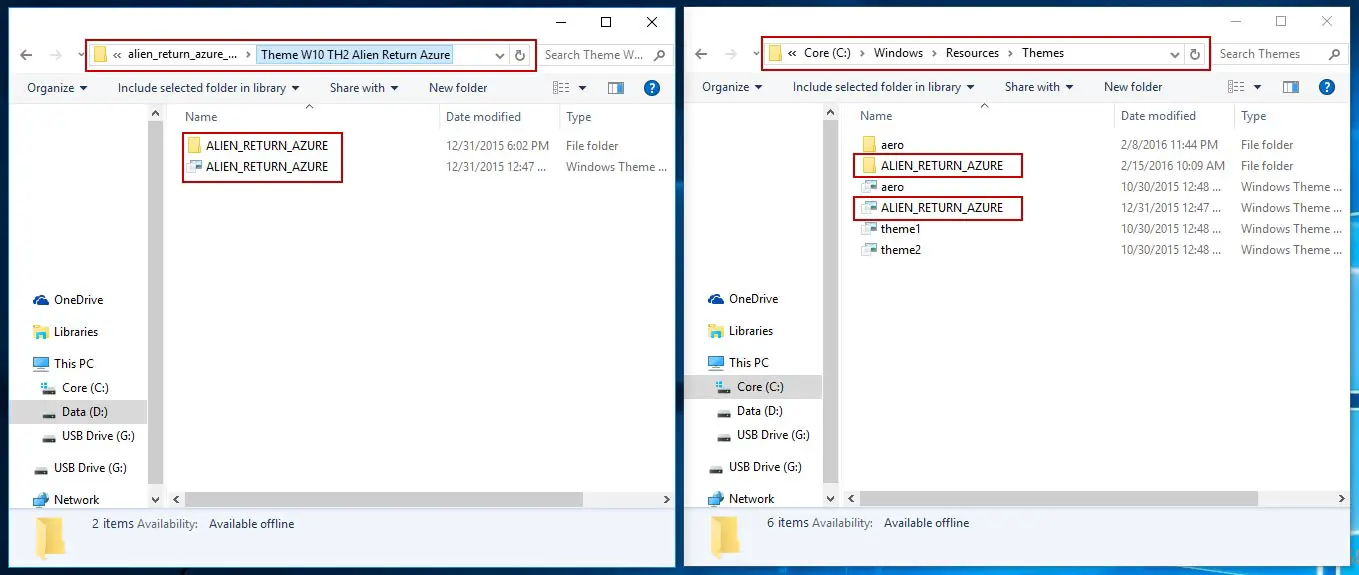
Extract the contents of the Visual Style file that you downloaded into a new folder. You should find a .theme file and a folder of the same name inside it. For example, as seen below, a ALIEN_RETURN_AZURE .theme file and a folder of the same name.
Copy and paste these two into the C:\Windows\Resources\Themes folder of your PC so you have something like this.
Run the .theme file to activate the theme.
If your system was patched correctly, your theme should be activated and your Windows Explorer should look completely different and you’re done! You can stop reading and enjoy your new themes.
If not, don’t worry. Keep reading.
4.b. Additional Manual Patching
If your theme did not work as intended after the previous step, reset your theme back to Windows default. Then download this Theme Patcher file and we’ll manually change system files.
Extract the contents of the Theme Patcher.rar that you downloaded into a new folder. You’ll find a Add_Take_Ownership_to_context_menu file inside a Take Ownership REG files folder. Run it and confirm to complete the registry change.
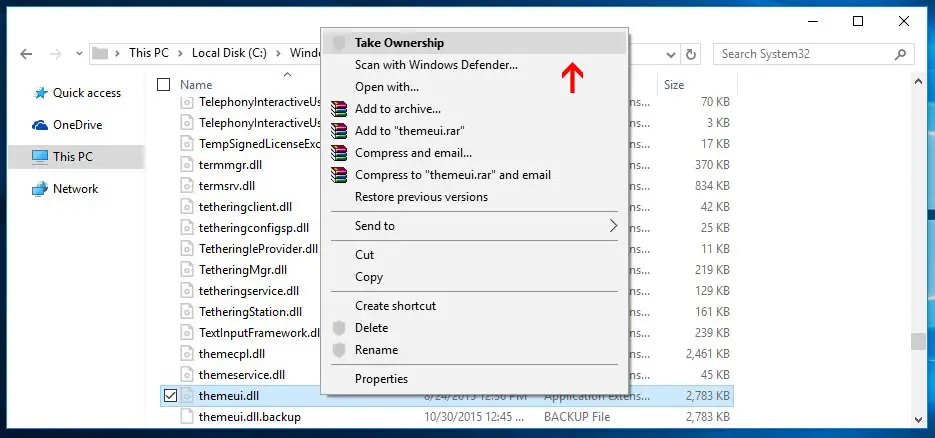
a. Now go to your C:\Windows\System32 folder and search for themeui.dll. Right click the file and click Open File Location.

b. Right click the file and click Take Ownership. Select Yes when prompted for confirmation.
c. Now right click the file again and rename it to themeui.dll.del. Click Yes and then Continue when prompted.

d. Now copy/paste the themeui.dll file that you’ll find in the File Patch x86 (if your Windows 10 is 32-bit) or File Patch x64 (if your Windows 10 is 64-bit) folders from Step 5 to the C:\Windows\System32 folder.
e. Repeat steps a to d for two more files: uxtheme.dll and uxinit.dll.
Once you’ve copy/pasted all 3 files, restart your system for patches to take effect.
After restart, run the .theme file of the theme that you want to use and it should work properly.
Once you’ve successfully patched your system once, you can then download any 3rd party theme and just run the .theme files to activate them.
If you run into any problems or questions, drop a comment below. Good luck!


 Windows 10 Theme")


")


[…] UXThemePatcher: Next, you need to patch your Windows 10 system so we can install 3rd party themes. Follow that link and do up to Step 3 (Patch your […]
[…] each theme which will take you to the deviantart download page. Be aware that you’ll have to patch your system in order to install these themes. All themes listed below are compatible with the November update […]
[…] UXThemePatcher: Next, you need to patch your Windows 10 system so we can install 3rd party themes. Follow that link and do up to Step 3 (Patch your […]
[…] UXThemePatcher: Next, you need to patch your Windows 10 system so we can install 3rd party themes. Follow that link and do up to Step 3 (Patch your […]
Hey. First off, awesome themes, found all I wanted but I ran into a bit of a hitch. After the images are extracted and the theme’s up and running, the images do not change automatically as they should. I’m using Windows 10.0(Build 10240)
Which images are you talking about here? And which theme specifically?
are they all supported in Windows laptops as well ?