
– It Came from Outer Space to Take Over Your Desktop –
A while ago, I put up an Alienware Windows 10 Theme tutorial. This is the red version of the same theme.
Introduction & Preparation
The following is high-level desktop customization. You’ll be using various tools and resources to bring together a unique desktop that represents the futuristic sci-fi theme of the Alienware systems regardless of whether you actually own an Alienware PC or not.
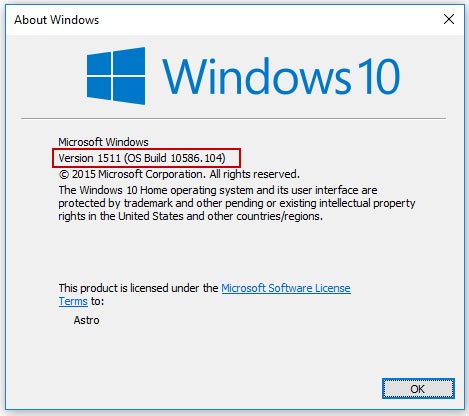
1. REQUIREMENTS: This theme requires that you have Windows 10 with the November 2015 update installed. So it must be Version 1511, Build 10586. Trying this theme on older builds is not likely to work. To find out which version of Windows you have, type winver in the start menu and hit enter.
2. CAUTION: While the process is fairly simple and should take about 15 – 30 minutes to set up, make sure you follow the instructions correctly and backup any file that you may have to modify. Just drop a comment below if you need any help. Before we begin installing the theme, make sure you create a system restore point so that we can restore our PC in case something goes wrong. It is really important you do this before going to the next step.
3. TO DOWNLOAD: Imagine we are going to build a spaceship and we need to assemble all the parts first. Download these 4 files that are listed below. Do NOT run any of them for now.
Extract the contents of the AlienwareRedThemeRaiderDownloads.rar into a new folder and put the other 2 files that you downloaded in there as well. So you end up with a similar folder like this for quick access.

Now we’ll move on to installing the visual style for our theme.
Installing Alienware Visual Style

A Visual Style is a 3rd party theme that will change several aspects of your PC. This includes changes to your explorers, task bar, start menu, cursor, sound and icons. Credits to AlienByte for creating the Alienware Red visual style that we’ll be using.
In order to use 3rd party themes, you need to patch your system by installing the following applications. If you’ve already used 3rd party themes before it is likely your system is already patched, in which case you may not have to install these applications again.
1. OldNewExplorer: Extract the OldNewExplorer.rar file that you downloaded to a new folder and run the OldNewExplorerCfg program. Set the settings as the same as the screenshot you see below. Hit Install and complete the installation.

2. StartIsBack: Next run the StartIsBackPlusPlus_setup.exe file that you downloaded and complete the installation. After installation, simply close the program if it runs automatically.
3. UXThemePatcher: Now extract the UXThemePatcher10.rar file that you downloaded and run the UXThemePatcher10.exe and complete the setup. After the installation is complete the system will do a quick restart.
4. Copy Theme Files: The next thing we need to do is extract the contents of the theme_w10__alien_return_red__november_update__by_alien_byte-d9m5pp2.zip file that you downloaded into a new folder. Navigate to the Theme W10 TH2 Alien Return Red folder inside it.
Copy paste the two contents of that folder (two ALIEN_RETURN_RED file/folders) into the C:\Windows\Resources\Themes folder of your PC.
5. More Patching: Extract the contents of the Theme Patcher.rar that you downloaded into a new folder. You’ll find a Add_Take_Ownership_to_context_menu file inside a Take Ownership REG files folder. Run it and confirm to complete the registry change.
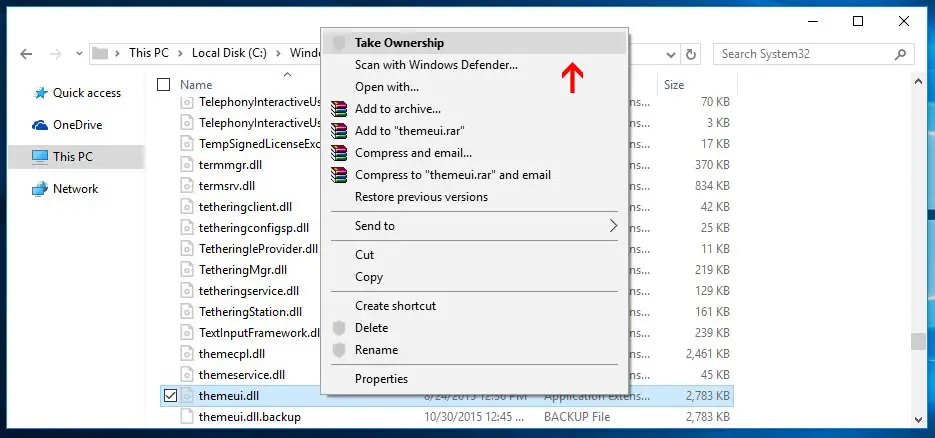
5a. Now go to your C:\Windows\System32 folder and search for themeui.dll. Right click the file and click Open File Location.

5b. Right click the file and click Take Ownership. Select Yes when prompted for confirmation.
5c. Now right click the file again and rename it to themeui.dll.del. Click Yes and then Continue when prompted.

5d. Now copy/paste the themeui.dll file that you’ll find in the File Patch x86 (if your Windows 10 is 32-bit) or File Patch x64 (if your Windows 10 is 64-bit) folders from Step 5 to the C:\Windows\System32 folder.
5e. Repeat steps 5a to 5d for two more files: uxtheme.dll and uxinit.dll.
6. RESTART: Once you’ve copy/pasted all 3 files, restart your system for patches to take effect.
7. Taskbar Color Effect: Extract the contents of the TBCE.zip file that you downloaded into a new folder. Run the Taskbar Color Effect.exe file that you extracted. You’ll find it added as a new icon in your systray. Right click the icon and go to Settings.

Once it opens, select Custom Image BG option. It’ll prompt you to select an image so browse to the Taskbar Alien Return Red TBCE folder that you extracted in Step 4 and select that Alien Return Red taskbar image.

Click Save for changes to take effect.
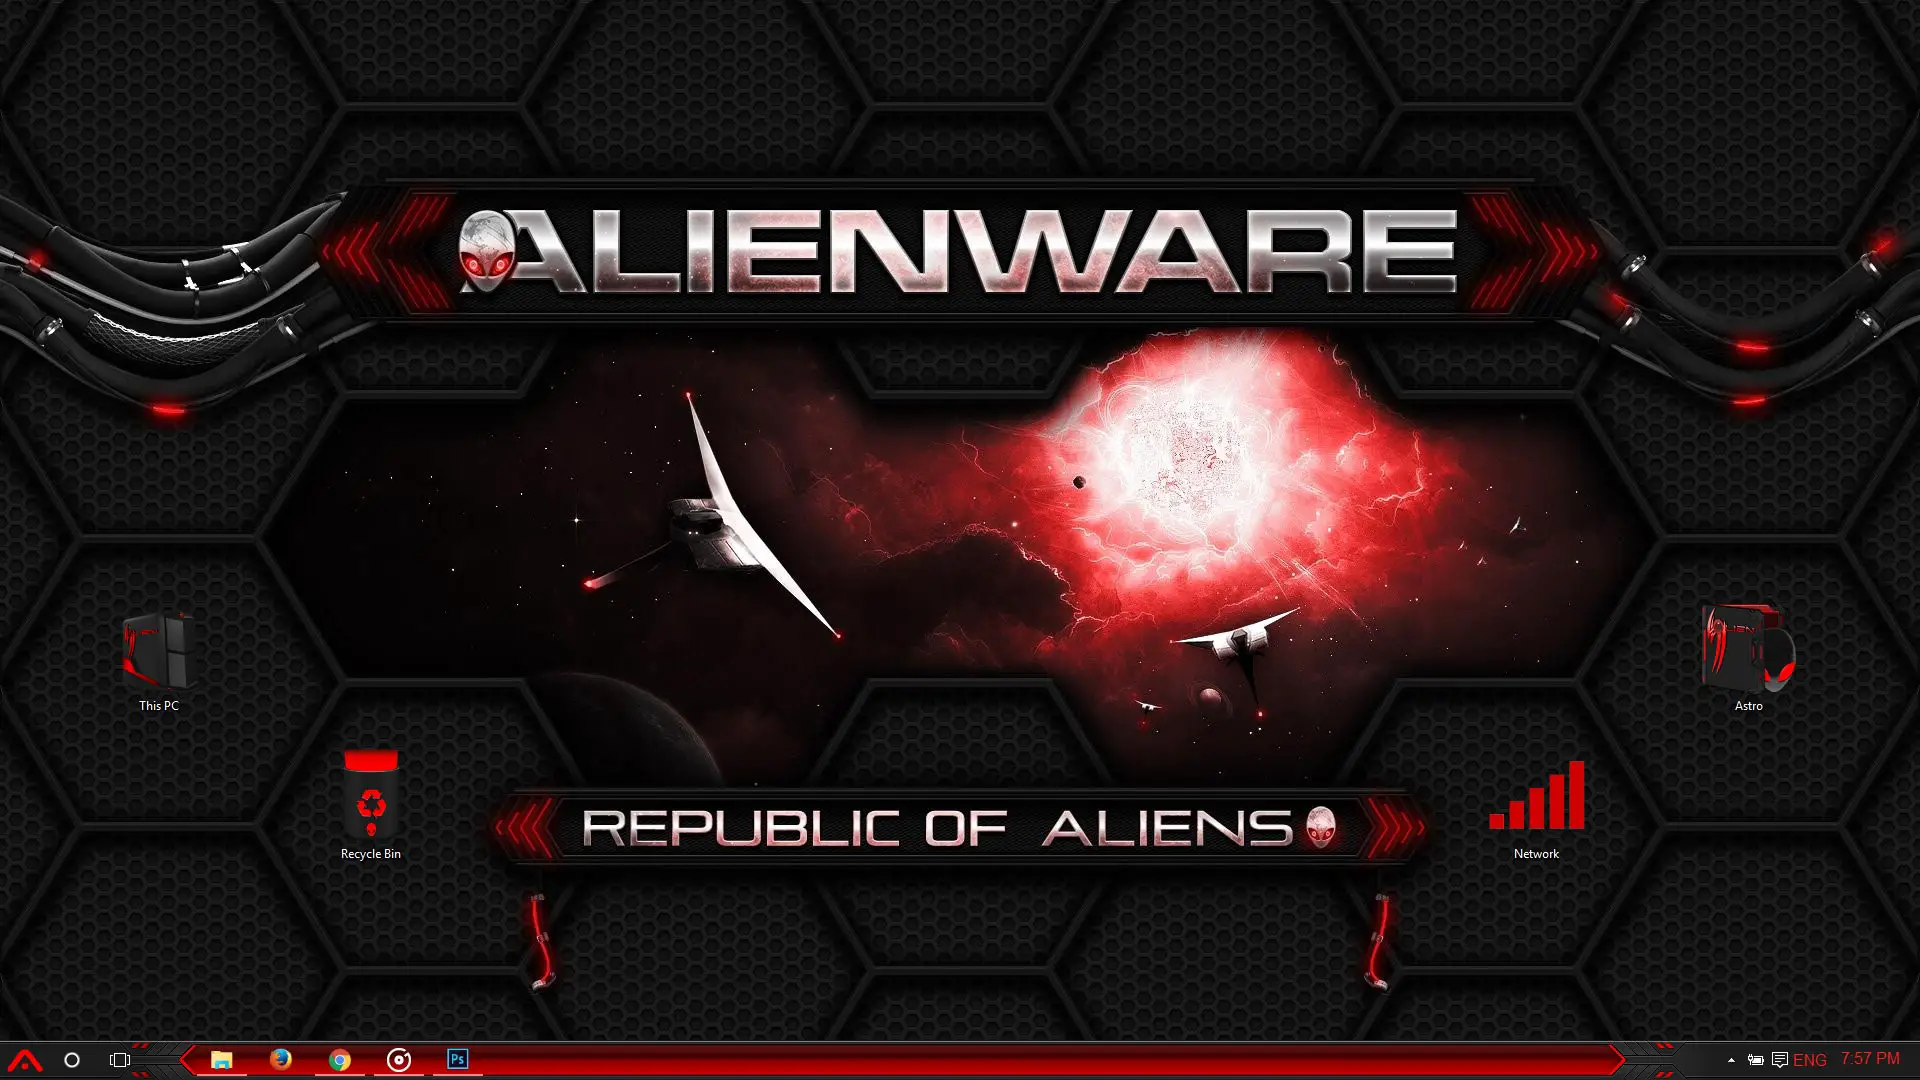
8. Alienware Theme Raider Theme Pack: For the last step, run the AlienwareRedThemeRaider.deskthemepack file that you downloaded. And voila, if you did everything right, you’ll have something that looks like this with modified explorers, task bar, icons, cursors and sounds.

If your taskbar doesn’t look the same, try to run StartIsBack and set the transparency of the taskbar to 100%. Also make sure the taskbar icons are set to Large Size by right clicking the taskbar and selecting Properties.
If it still doesn’t look right, drop a comment below with a screenshot of your PC and I’ll take a look.
And that’s it! Congrats~! You’ve successfully completed this tutorial. Kudos to you for sticking through to the end!
RESET TO DEFAULT: Change the theme back to the default Windows 10 theme to switch back the Visual Style to default. Uninstall StartIsBack to switch back to the Windows 10 task bar and Start Menu.
CREDITS: As mentioned before, credits to deviantart users designfjotten and AlienByte for creating the cool wallpaper and visual style respectively.
Hope you liked this theme. If you have any questions, suggestions or comments, drop them below. Good luck~!


 Custom Windows Theme")


")


Can u make one for the new version of windows 10, version 1607
I’ll look into it. Themes are getting more stable and compatible, so I’ll update you once I have something good.
Hay
After 5d and i restart my laptop
My laptop stuk in black screen
Its also the display is turn blink
You’ve probably made an error during the copying or your build doesn’t support the theme. Just revert back to a previous restore point.
https://support.microsoft.com/en-us/help/12376/windows-10-start-your-pc-in-safe-mode
Boot in safe mode and then do a system restore.
Okey thanks
https://uploads.disquscdn.com/images/56bd39e747243d0574c4d59f34b03b2daa521e1aecb0a640ce3ed76007b1acb0.jpg
please, can give me specific instructions via video is not, thank
I have done all the steps but some features dont work in my laptop ..like taskbar background and changing the icons to the theme ..only the desktop background appears..also in editing the Themeui.dll it does not give the option to take ownership